To Get To The Other Side: Difference between revisions
More actions
m infobox |
Addition of new sections + other small changes |
||
| Line 2: | Line 2: | ||
| title = [[File:Icon TGTTOS.png|32px]] [[To Get To The Other Side]] | | title = [[File:Icon TGTTOS.png|32px]] [[To Get To The Other Side]] | ||
| image = Tgttos banner.png | | image = Tgttos banner.png | ||
| description = Race to the other side and whack a chicken faster than other players! This game is played over 3 rounds on 3 different maps. | | description = Race to the other side and whack a chicken faster than other players! This game is played over 3 rounds on 3<br />different maps. | ||
| type = Movement | | type = Movement | ||
| abbreviation = TGTTOS | | abbreviation = TGTTOS | ||
| introduced = [[0.1.0]] (August 20th, 2022) | | introduced = [[0.1.0]]<br />(August 20th, 2022) | ||
| maps = 20 | | maps = 20 | ||
| rounds = 3 | | rounds = 3 | ||
| duration = 90 Seconds | | duration = 90 Seconds | ||
| players = 16-20 | | players = 16-20 | ||
}} | }} | ||
== Modifiers == | '''To Get To The Other Side''' is a movement-based game on MCC Island, which was introduced in [[Patch 0.1.0]], with the release of the server. | ||
== Official Description == | |||
The aim of To Get to the Other Side is obvious… get to the other side! Put your bridging skills to good use, or jump and parkour to find the best route to the end. Once you’re there, it’s time to whack that chicken! Sabotage is a part of this game, so expect plenty of chaos! | |||
== Gameplay == | |||
To Get To The Other Side is a movement-centric game which takes place across three rounds. Each player must race from the starting location to the chicken pit at the end of the map, and punch a chicken. Score is granted to players based on what place they earn at the end of each round, plus a bonus for finishing in the top ten. Players are also able to punch each other tactically in order to attempt to secure a better placement. | |||
=== Modifiers === | |||
Every round played, there is a chance that a modifier becomes active. These modifiers can range from level changes, to extra items to sabotage other players. Below is a list of each: | Every round played, there is a chance that a modifier becomes active. These modifiers can range from level changes, to extra items to sabotage other players. Below is a list of each: | ||
* Crack Shot - Players are given a punch 3 bow and two arrows, which slowly regenerate over time. | * '''Crack Shot''' - Players are given a punch 3 bow and two arrows, which slowly regenerate over time. | ||
* Crumbling Blocks - Blocks placed by players quickly crack and then are destroyed. | * '''Crumbling Blocks''' - Blocks placed by players quickly crack and then are destroyed. | ||
* Double Time - Players move extremely quickly, but the maximum round time is halved (from 90 to 45 seconds). | * '''Double Time''' - Players move extremely quickly, but the maximum round time is halved (from 90 to 45 seconds). | ||
* Early Birds - Chickens are spawned intermittently throughout the map, before the chicken pit at the end. | * '''Early Birds''' - Chickens are spawned intermittently throughout the map, before the chicken pit at the end. | ||
* One Life - Each player only has one life. If the player falls into the void, they automatically DNF. | * '''One Life''' - Each player only has one life. If the player falls into the void, they automatically DNF. | ||
* Red Light, Green Light - A traffic light, with text and audio ques, is shown at the top of the screen. During green light, players can move safely. During red light, players have a short amount of time to stop moving, or risk exploding and being sent back to the start. Certain movement, such as punching, and breaking/placing blocks, is allowed during the red light. The maximum round time is also extended to 2 minutes. | * '''Red Light, Green Light''' - A traffic light, with text and audio ques, is shown at the top of the screen. During green light, players can move safely. During red light, players have a short amount of time to stop moving, or risk exploding and being sent back to the start. Certain movement, such as punching, and breaking/placing blocks, is allowed during the red light. The maximum round time is also extended to 2 minutes. | ||
* Slap Stick - players are given a knockback 3 stick. | * '''Slap Stick''' - players are given a knockback 3 stick. | ||
* TNT Time - Lit TNT rains from the sky. This TNT can break blocks (including blocks that make up the level) and deal knockback. | * '''TNT Time''' - Lit TNT rains from the sky. This TNT can break blocks (including blocks that make up the level) and deal knockback. | ||
=== Experience Table === | |||
TBA | |||
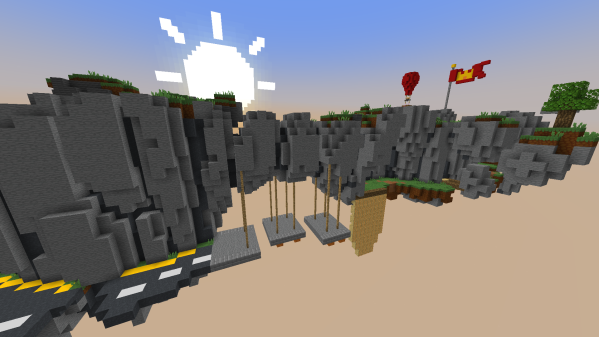
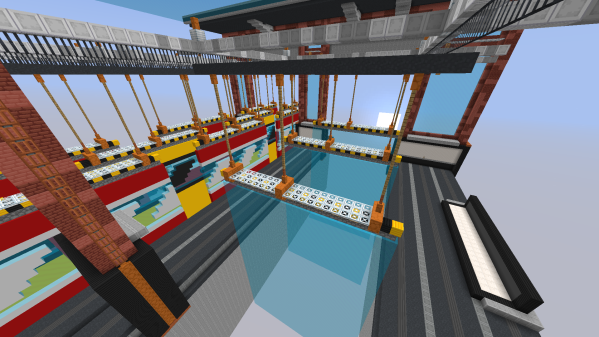
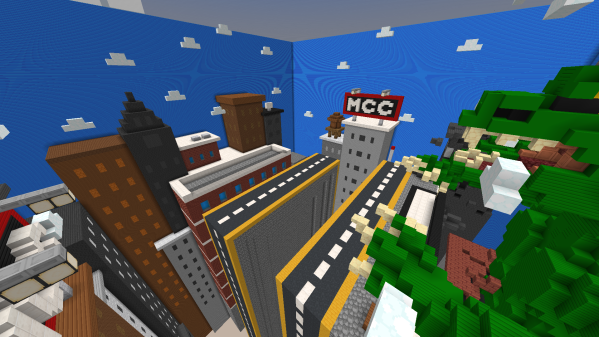
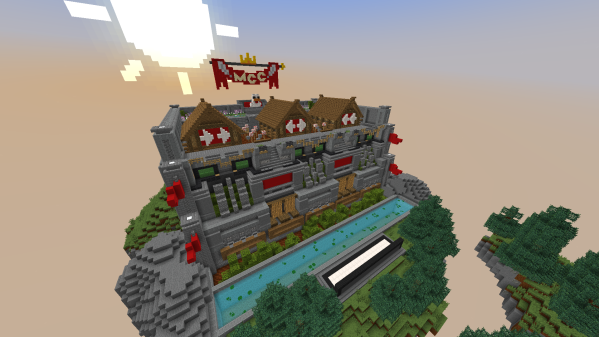
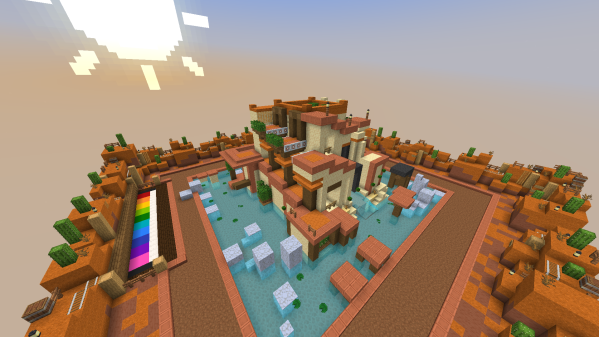
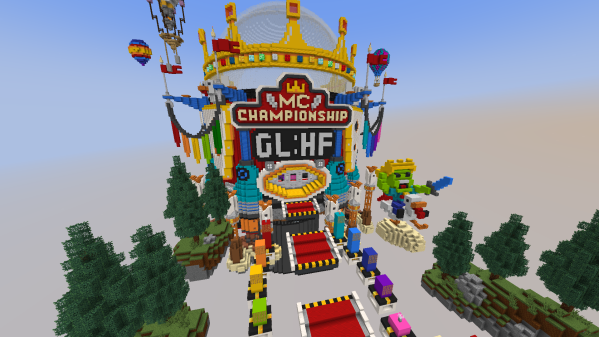
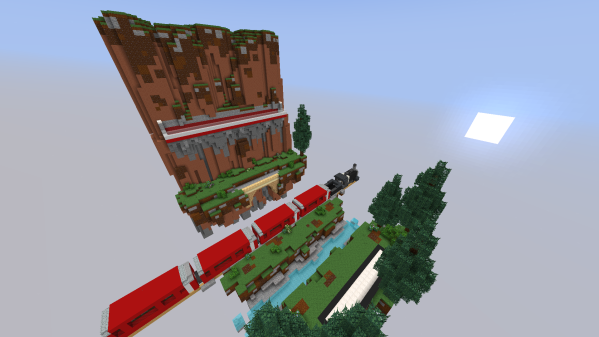
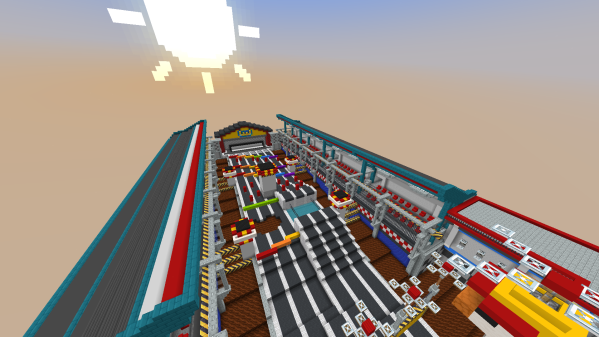
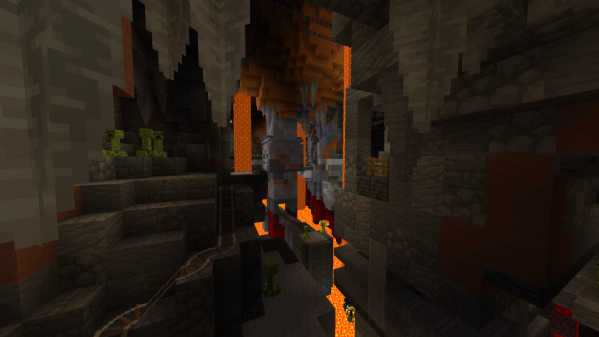
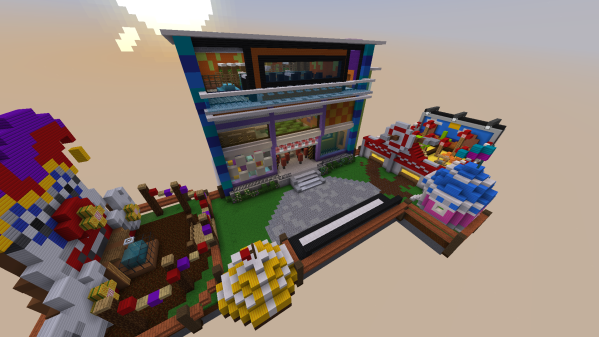
=== Maps === | === Maps === | ||
<gallery mode="packed" widths="400" heights="225"> | <gallery mode="packed" widths="400" heights="225"> | ||
TGTTOS Cliff.png|Cliff | |||
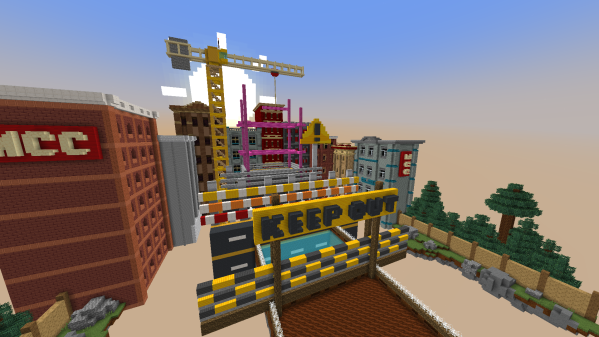
TGTTOS Industry.png|Industry | |||
TGTTOS Pits.png|Pits | |||
TGTTOS Siege.png|Siege | |||
TGTTOS Treetop.png|Treetop | |||
TGTTOS Walls.png|Walls | |||
TGTTOS Badlands.png|Badlands (Since [[0.2.0]]) | |||
TGTTOS Beehive.png|Beehive (Since [[0.2.0]]) | |||
TGTTOS Skydive.png|Skydive (Since [[0.6.0]]) | |||
TGTTOS Water Park.png|Water Park (Since [[0.6.0]]) | |||
TGTTOS Shallow Lava.png|Shallow Lava (Since [[0.8.0]]) | |||
TGTTOS Skyscraper.png|Skyscraper (Since [[0.8.0]]) | |||
TGTTOS Sky Train.png|Sky Train (Since [[0.8.0]]) | |||
TGTTOS Spiral.png|Spiral (Since [[0.8.0]]) | |||
TGTTOS To The Dome.png|To The Dome (Since [[0.8.0]]) | |||
TGTTOS Train Passing.png|Train Passing (Since [[0.8.0]]) | |||
TGTTOS Chilli Con Carnage.png|Chilli Con Carnage (Since [[0.10.0]]) | |||
TGTTOS Racetrack.png|Racetrack (Since [[0.10.0]]) | |||
TGTTOS Canyon.png|Canyon (Since [[0.11.0]]) | |||
TGTTOS Fun House.png|Fun House (Since [[0.11.0]]) | |||
</gallery> | </gallery> | ||
== [[File:Icon-Badges.png|32px]] Badges == | |||
Currently, there are 47 stages of badges for To Get To The Other Side, rewarding a total of 2,435 [[File:Icon-Champion Score.png|16px]] trophies. | |||
{| class="wikitable" style="text-align: center; width: 100%" | |||
!colspan="2"|Name | |||
!Description | |||
![[File:Icon-Champion Score.png|16px]] Trophies Rewarded | |||
|- | |||
|[[File:Chicken Puncher Badge.png|50px]] | |||
|Chicken Puncher <br /> ('''I''' - '''VII''') | |||
|Punch '''50''' / '''150''' / '''325''' / '''700''' / '''1300''' / '''2250''' / '''3750''' chickens in games of To Get To The Other Side. | |||
|'''Stages''': 10 / 15 / 25 / 35 / 50 / 70 / 100 <br /> '''Total''': 305 | |||
|- | |||
|[[File:Got the Worm Badge.png|50px]] | |||
|Got the Worm | |||
|Place 1st in a round of TGTTOS where the 'Early Birds' modifier is active. | |||
|15 | |||
|- | |||
|[[File:Jackpot! Badge.png|50px]] | |||
|Jackpot! | |||
|Objective hidden... <div class="mw-customtoggle-Jackpot">['''Reveal''']</div> | |||
<div class="mw-collapsible mw-collapsed" id="mw-customcollapsible-Jackpot">Place 7th in every round of a game of TGTTOS.</div> | |||
|15 | |||
|- | |||
|[[File:Eggcellent Challenge Badge.png|50px]] | |||
|Eggcellent Challenge | |||
|Complete the Eggcellent Game Pass Challenge. | |||
|100 | |||
|- | |||
|[[File:Eggcellent Pass Badge.png|50px]] | |||
|Eggcellent Pass | |||
|Reach level 25 of the Eggcellent Game Pass. | |||
|250 | |||
|- | |||
|[[File:Roadworks Challenge Badge.png|50px]] | |||
|Roadworks Challenge | |||
|Complete the Roadworks Game Pass Challenge. | |||
|100 | |||
|- | |||
|[[File:Roadworks Pass Badge.png|50px]] | |||
|Roadworks Pass | |||
|Reach level 25 of the Roadworks Game Pass. | |||
|250 | |||
|- | |||
|[[File:Pave the Way Badge.png|50px]] | |||
|Pave the Way | |||
|Place 1st in a round of TGTTOS where you don't place any blocks, on a map where blocks can be placed. | |||
|25 | |||
|- | |||
|[[File:TGTTOS Round Champion Badge.png|50px]] | |||
|TGTTOS Round Champion <br /> ('''I''' - '''VII''') | |||
|Finish '''2''' / '''7''' / '''15''' / '''35''' / '''60''' / '''110''' / '''180''' rounds of To Get To The Other Side in 1st place. | |||
|'''Stages''': 10 / 15 / 25 / 35 / 50 / 70 / 100 <br /> '''Total''': 305 | |||
|- | |||
|[[File:TGTTOS Round Expert Badge.png|50px]] | |||
|TGTTOS Round Expert <br /> ('''I''' - '''VII''') | |||
|Finish '''15''' / '''50''' / '''110''' / '''250''' / '''425''' / '''750''' / '''1250''' rounds of To Get To The Other Side in 5th place or better. | |||
|'''Stages''': 10 / 15 / 25 / 35 / 50 / 70 / 100 <br /> '''Total''': 305 | |||
|- | |||
|[[File:Slapdown Badge.png|50px]] | |||
|Slapdown | |||
|Whack a chicken with a slapstick in a game of TGTTOS. | |||
|10 | |||
|- | |||
|[[File:TGTTOS Champion Badge.png|50px]] | |||
|TGTTOS Champion <br /> ('''I''' - '''VII''') | |||
|Finish '''1''' / '''2''' / '''5''' / '''10''' / '''20''' / '''40''' / '''60''' games of To Get To The Other Side in 1st place. | |||
|'''Stages''': 10 / 15 / 25 / 35 / 50 / 70 / 100 <br /> '''Total''': 305 | |||
|- | |||
|[[File:TGTTOS Expert Badge.png|50px]] | |||
|TGTTOS Expert <br /> ('''I''' - '''VII''') | |||
|Finish '''5''' / '''15''' / '''35''' / '''75''' / '''125''' / '''225''' / '''375''' games of To Get To The Other Side in 5th place or better. | |||
|'''Stages''': 10 / 15 / 25 / 35 / 50 / 70 / 100 <br /> '''Total''': 305 | |||
|- | |||
|[[File:Triple Champion Badge.png|50px]] | |||
|Triple Champion | |||
|Place 1st in all 3 rounds of a game of TGTTOS. | |||
|35 | |||
|- | |||
|[[File:Ultimate Comeback Badge.png|50px]] | |||
|Ultimate Comeback | |||
|Place 1st in a round of TGTTOS after getting knocked into the void at least once. | |||
|35 | |||
|- | |||
|[[File:Untouchable Speedster Badge.png|50px]] | |||
|Untouchable Speedster | |||
|Place 1st in a round of TGTTOS where the double time modifier is active without being hit. | |||
|50 | |||
|- | |||
|[[File:Victorious Pacifist Badge.png|50px]] | |||
|Victorious Pacifist | |||
|Place 1st in a game of TGTTOS without punching anyone. | |||
|25 | |||
|} | |||
== [[File:Icon-GamePasses.png|32px]] Game Passes == | |||
=== [[File:Eggcellent Game Pass.png|32px]] Eggcellent === | |||
TBA | |||
=== [[File:Roadworks Game Pass.png|32px]] Roadworks === | |||
TBA | |||
== Update History == | |||
TBA | |||
Revision as of 16:42, 7 October 2023
To Get To The Other Side is a movement-based game on MCC Island, which was introduced in Patch 0.1.0, with the release of the server.
Official Description
The aim of To Get to the Other Side is obvious… get to the other side! Put your bridging skills to good use, or jump and parkour to find the best route to the end. Once you’re there, it’s time to whack that chicken! Sabotage is a part of this game, so expect plenty of chaos!
Gameplay
To Get To The Other Side is a movement-centric game which takes place across three rounds. Each player must race from the starting location to the chicken pit at the end of the map, and punch a chicken. Score is granted to players based on what place they earn at the end of each round, plus a bonus for finishing in the top ten. Players are also able to punch each other tactically in order to attempt to secure a better placement.
Modifiers
Every round played, there is a chance that a modifier becomes active. These modifiers can range from level changes, to extra items to sabotage other players. Below is a list of each:
- Crack Shot - Players are given a punch 3 bow and two arrows, which slowly regenerate over time.
- Crumbling Blocks - Blocks placed by players quickly crack and then are destroyed.
- Double Time - Players move extremely quickly, but the maximum round time is halved (from 90 to 45 seconds).
- Early Birds - Chickens are spawned intermittently throughout the map, before the chicken pit at the end.
- One Life - Each player only has one life. If the player falls into the void, they automatically DNF.
- Red Light, Green Light - A traffic light, with text and audio ques, is shown at the top of the screen. During green light, players can move safely. During red light, players have a short amount of time to stop moving, or risk exploding and being sent back to the start. Certain movement, such as punching, and breaking/placing blocks, is allowed during the red light. The maximum round time is also extended to 2 minutes.
- Slap Stick - players are given a knockback 3 stick.
- TNT Time - Lit TNT rains from the sky. This TNT can break blocks (including blocks that make up the level) and deal knockback.
Experience Table
TBA
Maps
-
 Cliff
Cliff -
 Industry
 -
 Pits
Pits -
 Siege
Siege -
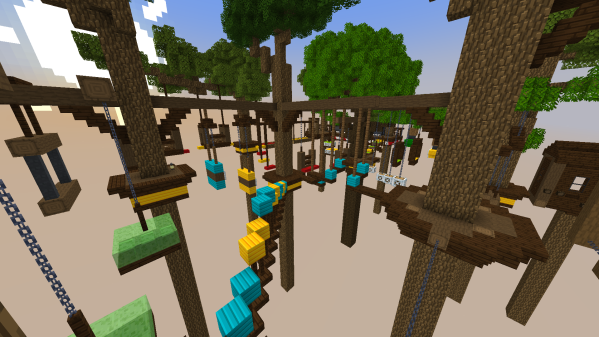 Treetop
 -
 Walls
Walls -
 Badlands (Since 0.2.0)
 -
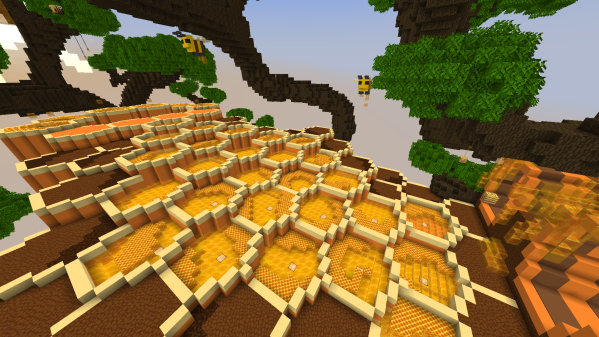 Beehive (Since 0.2.0)
 -
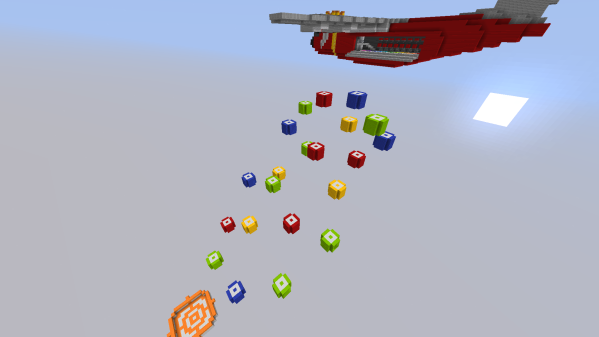 Skydive (Since 0.6.0)
 -
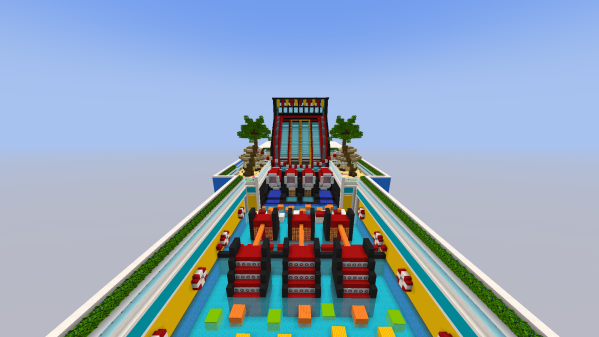 Water Park (Since 0.6.0)
 -
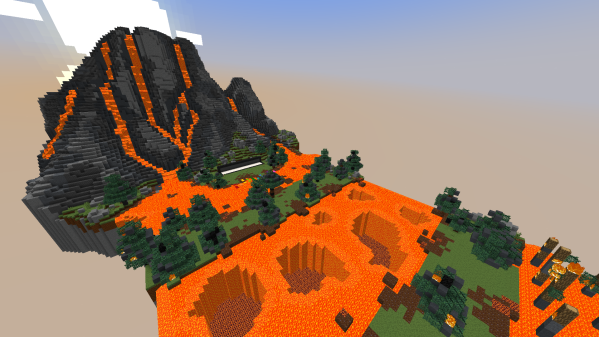 Shallow Lava (Since 0.8.0)
 -
 Skyscraper (Since 0.8.0)
 -
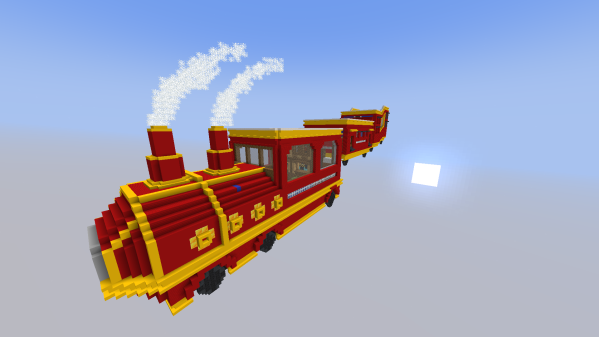 Sky Train (Since 0.8.0)
 -
 Spiral (Since 0.8.0)
 -
 To The Dome (Since 0.8.0)
 -
 Train Passing (Since 0.8.0)
 -
 Chilli Con Carnage (Since 0.10.0)
 -
 Racetrack (Since 0.10.0)
 -
 Canyon (Since 0.11.0)
 -
 Fun House (Since 0.11.0)


 Badges
Currently, there are 47 stages of badges for To Get To The Other Side, rewarding a total of 2,435 ![]() trophies.
trophies.
| Name | Description | ||
|---|---|---|---|
| Chicken Puncher (I - VII) |
Punch 50 / 150 / 325 / 700 / 1300 / 2250 / 3750 chickens in games of To Get To The Other Side. | Stages: 10 / 15 / 25 / 35 / 50 / 70 / 100 Total: 305 | |
| Got the Worm | Place 1st in a round of TGTTOS where the 'Early Birds' modifier is active. | 15 | |
| Jackpot! | Objective hidden... [Reveal]
Place 7th in every round of a game of TGTTOS.
|
15 | |
| Eggcellent Challenge | Complete the Eggcellent Game Pass Challenge. | 100 | |
| Eggcellent Pass | Reach level 25 of the Eggcellent Game Pass. | 250 | |
| Roadworks Challenge | Complete the Roadworks Game Pass Challenge. | 100 | |
| Roadworks Pass | Reach level 25 of the Roadworks Game Pass. | 250 | |
| Pave the Way | Place 1st in a round of TGTTOS where you don't place any blocks, on a map where blocks can be placed. | 25 | |
| TGTTOS Round Champion (I - VII) |
Finish 2 / 7 / 15 / 35 / 60 / 110 / 180 rounds of To Get To The Other Side in 1st place. | Stages: 10 / 15 / 25 / 35 / 50 / 70 / 100 Total: 305 | |
| TGTTOS Round Expert (I - VII) |
Finish 15 / 50 / 110 / 250 / 425 / 750 / 1250 rounds of To Get To The Other Side in 5th place or better. | Stages: 10 / 15 / 25 / 35 / 50 / 70 / 100 Total: 305 | |
| Slapdown | Whack a chicken with a slapstick in a game of TGTTOS. | 10 | |
| TGTTOS Champion (I - VII) |
Finish 1 / 2 / 5 / 10 / 20 / 40 / 60 games of To Get To The Other Side in 1st place. | Stages: 10 / 15 / 25 / 35 / 50 / 70 / 100 Total: 305 | |
| TGTTOS Expert (I - VII) |
Finish 5 / 15 / 35 / 75 / 125 / 225 / 375 games of To Get To The Other Side in 5th place or better. | Stages: 10 / 15 / 25 / 35 / 50 / 70 / 100 Total: 305 | |
| Triple Champion | Place 1st in all 3 rounds of a game of TGTTOS. | 35 | |
| Ultimate Comeback | Place 1st in a round of TGTTOS after getting knocked into the void at least once. | 35 | |
| Untouchable Speedster | Place 1st in a round of TGTTOS where the double time modifier is active without being hit. | 50 | |
| Victorious Pacifist | Place 1st in a game of TGTTOS without punching anyone. | 25 | |
 Game Passes
 Eggcellent
TBA
 Roadworks
TBA
Update History
TBA